*This article may contain product links which pay me a small commission if you make a purchase. Learn more.
How do you throw a curveball? You hold the ball on the inside edge of the horseshoe seam and think about directing your fingers over the top of the ball as it’s delivered. This applies forward spin (topspin) either at a 12-6 or 1-7 orientation (righties – the opposite for lefties) that forces the ball to break according to the magnus effect. Curveballs are very effective when thrown as hard as possible.
But first, I want to mention that good pitching mechanics are a HUGE part of being able to throw a pro style curveball, the way you want to learn the pitch. If a pitcher’s mechanics are rough, he will struggle to consistently spin and locate his curve.
That said, if you need help with your pitching mechanics, be sure to watch the video below, which is very detailed and thorough.
But isn’t the grip the most important thing?
The grip is important, yes.
But, the grip doesn’t matter nearly as much as the way it’s thrown, but we will cover ALL the major curve grips in the second half of this article, so scroll down for photos of all of them.
Jump Ahead to Sections on Grips, Spin and More
Why Do So Many Young Pitchers Throw Poor Curves?
Now, every pitcher thinks he knows how to do it, but the reality is that it’s not an easy pitch to master. Pitching grips only carry a player so far, and he has to know the right way to throw any given off speed pitch. Sliders and changeups are also difficult pitches that take a lot of focus and time to learn.
Snap it! Twist your wrist! Get it out in front!
In this article, I’m going to explain what a good curveball looks like, and how we throw one.
Because developing a great curveball takes years of practice, getting buy-in first requires an understanding of how and why the pitch does what it does.
And before we get any further on this detailed article – are you sure a curveball is right for you? For some pitchers, a slider is a better choice. Learn the difference between the two pitches in the video below.
Curveball Factor #1: It’s All About Spin Direction.
The magnus effect is what makes a curveball break.
When the ball spins in the direction it is thrown, with topspin in either a 12-to-6 or 1-to-7 orientation (referring to a clock, with 11-to-5 being the spin direction unique to lefties), it creates a high pressure zone on top, and a low pressure air flow below the ball. The high pressure air forces the ball downward, causing it to break downward.
Most amateur pitchers, as they learn their first curveball, turn their wrist sideways, imparting sidespin on the ball. This creates the high and lower pressure zones on the side of the ball, which doesn’t cause it to break downward. Thus, the pitch doesn’t break very “sharply” downward like the curveball of your favorite Major League star.
To learn more about spin and pitch execution, grab a copy of my pitching book below.

12-6? 1-7? Which Spin is Best?
We have to impart forward spin, as “cleanly” as we can to the baseball. By clean, I mean that it spins in only one direction, on one axis. We don’t want sidespin mixed in with our forward spin.
Some pitchers throw their best, sharpest curveball from a 12-6 orientation, but others throw it at 1-7 (again, talking about righties; lefties would be 11-5). Neither is better, but some pitchers produce higher-quality spin at one specific direction and not another.
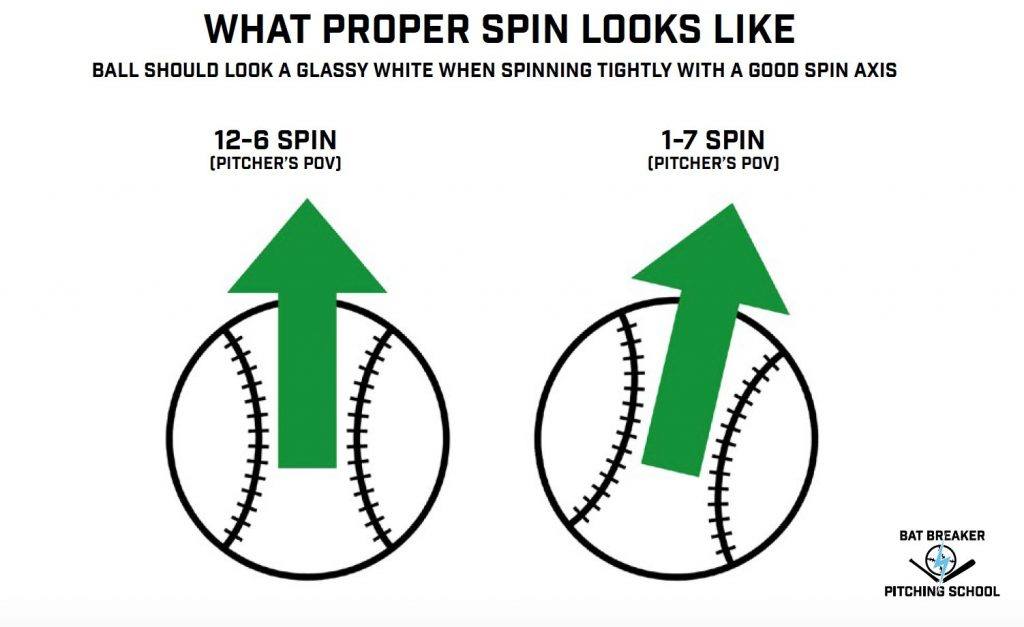
Personally, I had a very sharp curveball at 12-6, but my best version was 11-7. I figured this out through trial and error, with good feedback from trusted coaches, catchers and hitters.
Now that we know that we need topspin in a “clean” axis, we then need to apply this spin to the ball. This starts with the grip.
Curveball Factor #2: Faster Spin = + Faster Speed = Better Break
The last two factors in curveball quality are the speed at which it’s thrown, and the rate of spin (measured in RPMs).
Spin Speed
We want higher RPMs – without regard to spin axis, the faster the ball spins, the better. It’s that simple.
Pitch Speed
The curveball should be thrown – just like all pitches – as hard as the fastball. The arm-speed for all pitches should be 100% at all times, but the output speed, the final radar gun speed, is determined by how much speed is converted into spin.
How a Curve Will Break Differently Based on Speed:
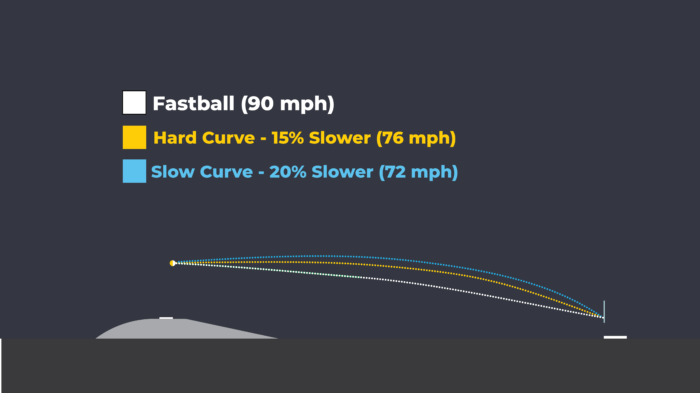
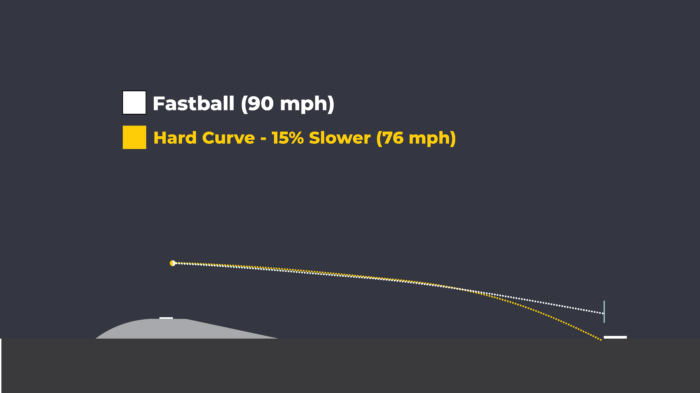
The curveball–like any pitch–will break according to spin, speed and initial trajectory. Here are a few diagrams to help illustrate this point (along with a video).
The diagram below shows how a slow curve has to go upward much more, making it more visible to a hitter compared to a fastball or harder-thrown curve ball.
In this diagram below, you’ll see how hard curveballs look like fastballs for longer.
Why Spin Affects Speed
In a fastball, all the force is applied to the center of the ball, apply velocity and backspin to it. This is the more pure transfer of arm speed into the ball.
The reason a curveball, changeup, cutter, slider, sinker – you name it – is slower is because we convert arm speed into spin. The grip and the hand action help us do just that. But, remember – every pitch is thrown with 100% intensity…it’s the output velocity that depends on the pitch.
Curveball Grip Variations
There’s really just one curveball grip, with a number of different, slight variations. Basically, the curveball a 12-year old throws is the same as most Major Leaguers, but the main difference is execution. As we discussed already, this execution is in the type of spin we apply. Major Leaguers apply topspin, little leaguers apply a sloppy mixture of slow sidespin and topspin.
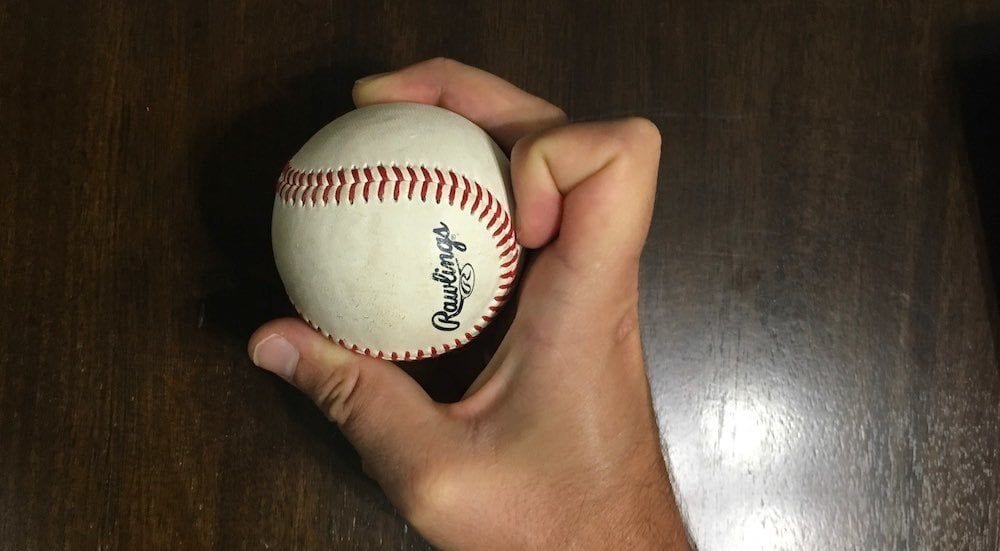
These are the variations of the curveball grip, all of which deal with the index finger’s placement:
- Finger on top of ball
- Finger crossed
- Finger sticks up (ala Adam Wainwright)
- Fingernail digs in
- Knuckle-Curve
That’s about it. You can throw a curveball in a four-seam or two-seam orientation, but I strongly feel that no one should ever throw the 2-seam version (I explain why in the short video below).
Choose a grip (start with the standard finger on top of the ball variation) and see how it feels, and get some feedback from a qualified partner on how it looks. Then, tinker. Try others, and see which grip works best for you. Remember: NO grip is best, and any can produce an amazing curveball – it just depends on the person and his level of comfort with it, and his unique way of throwing.
Want to know the best curveball grips that are used by nearly every pro pitcher in baseball? They’re all in this article…
The Truth: There Aren’t That Many Different Curveball Grips
Yep, the core finger placement is mostly the same, with only minor variations in the placement of the index finger. The truth is, throwing a good curveball is mostly about how you spin the ball.
Producing good spin is a combination of understanding the mechanics of the pitch, along with having pitching mechanics that can deliver your hand to the right spot repeatedly.
Curveball Spin Basics
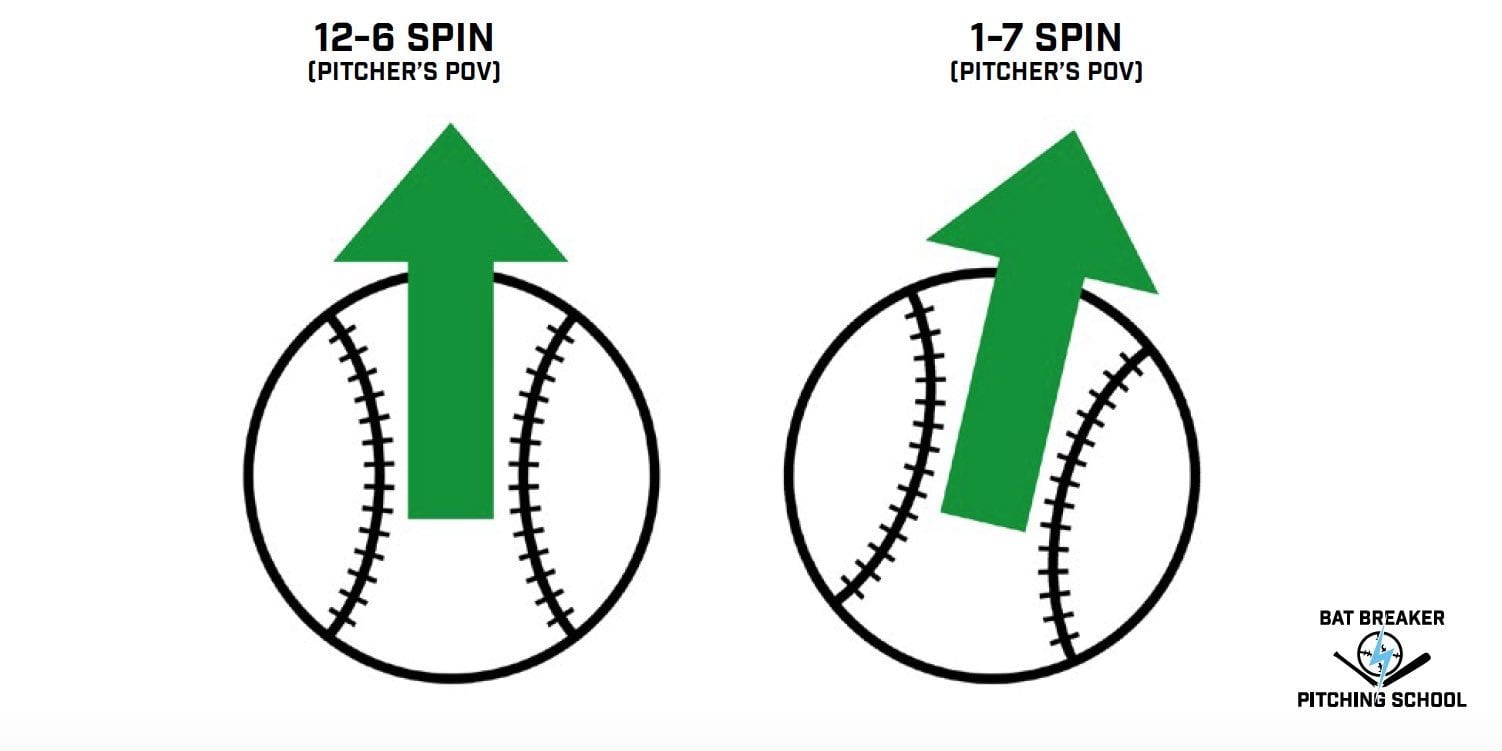
Here’s what you need to know:
- The goal is to produce topspin (forward spin) either directly forward (as in a 12-to-6 curveball) or at a slight angle (1/7 break for righties, or 11/5 break for lefties). For reference, 1/7 refers to the pitch breaking from one o’clock down to 7 o’clock.
- Producing topspin creates a high pressure zone of air above the ball along with a low pressure zone below it. The high pressure pushes the ball down, causing break.
- Curveballs have a constant and gradual break, but when they are thrown very hard (at about 85% of the fastball’s speed) and with very fast spin (2600+ RPMs is fast), they appear to break very sharply.
- Any mixing of sidespin along with the top spin causes the break to be less sharp, as the mixture of spin produces less air pressure forcing the ball to break downward.
What’s the curveball grip actually look like at release? Check out this video I made showing the slow motion curveball release.
A Good Curveball Grip Allows Each Unique Pitcher to Impart His Best Spin.
No one grip is better than another! Rather, a pitcher should try different grips out and find the one that feels the most comfortable and produces the best result. But – how will a pitcher know which pitch produces the best curveball? Answer: The throwing partner.
A good throwing partner – who knows what to look for and will give honest feedback – is critical to the pitch-development process.
What a Good Throwing Partner Does For a Pitcher
- That one was really sharp!
- That one wasn’t as good.
- That one was kind of slurvy.
- That one was too loopy.
- The spin on that last one was too sloppy – too much sidespin
- You got around that last one, and it had too much lateral break
Each throwing partner’s method of feedback will vary, but it’s critical that he gives constructive criticism and explains what he sees in each pitch. Pitchers will not be able to tell for themselves which curveballs are the sharpest versions. Even with veteran pro pitchers, it becomes very difficult to tell two very similar pitches apart. The help of the throwing partner and/or catcher is needed.
Different Curveball Grips
Remember! Getting the right curveball grip is important, but it’s just one piece of the puzzle. The grip will not make you Adam Wainwright or Clayton Kershaw – the grip is merely like opening the car door. Opening the door and sitting down in a car won’t make you a race car driver…but it’s necessary if you want a chance to be one.
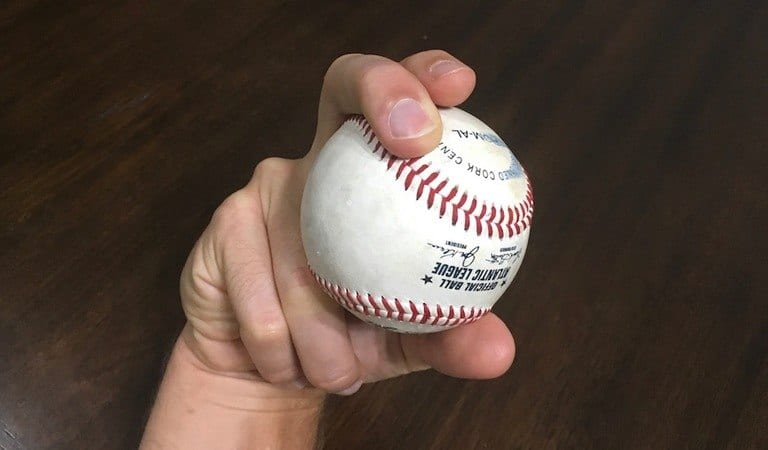
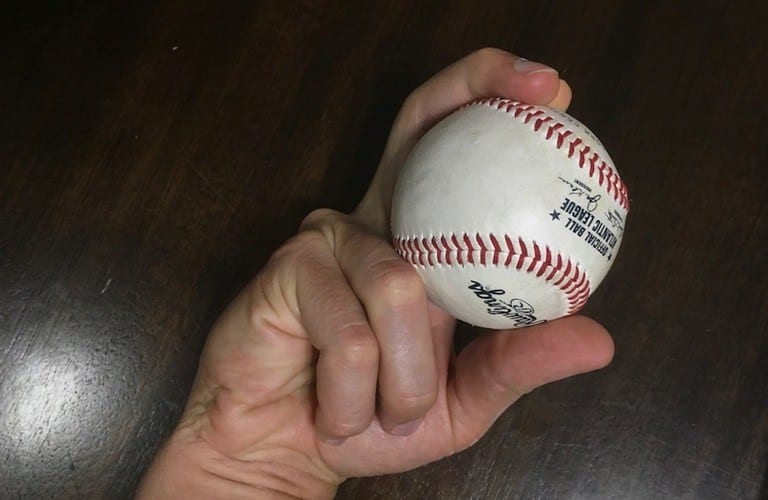
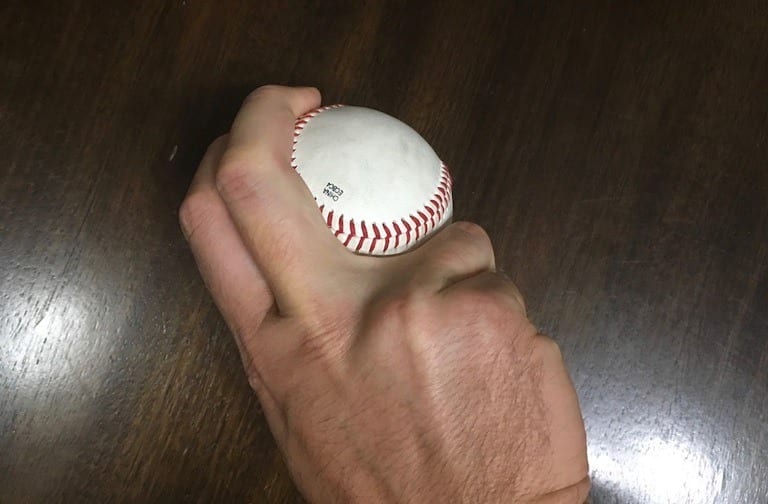
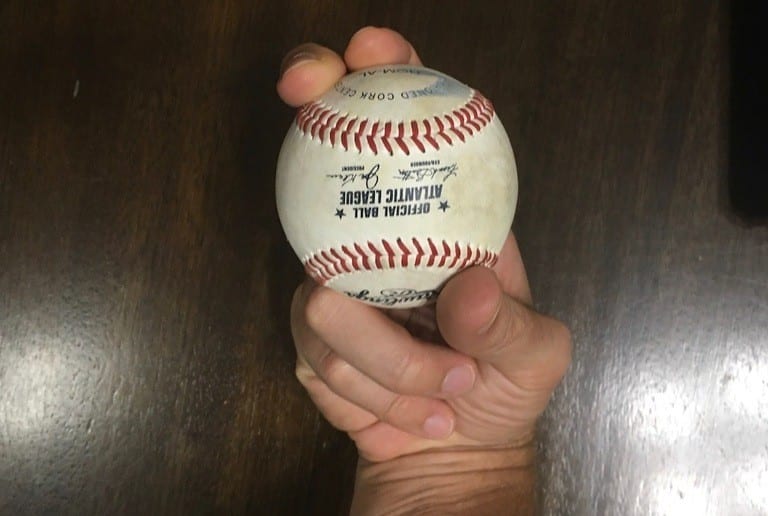
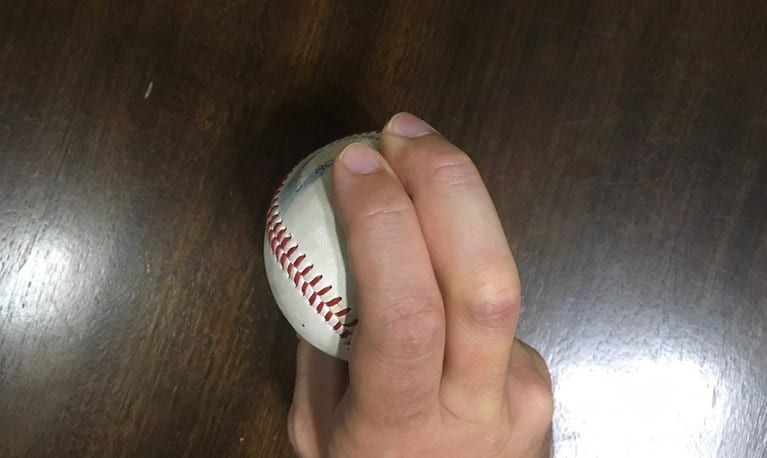
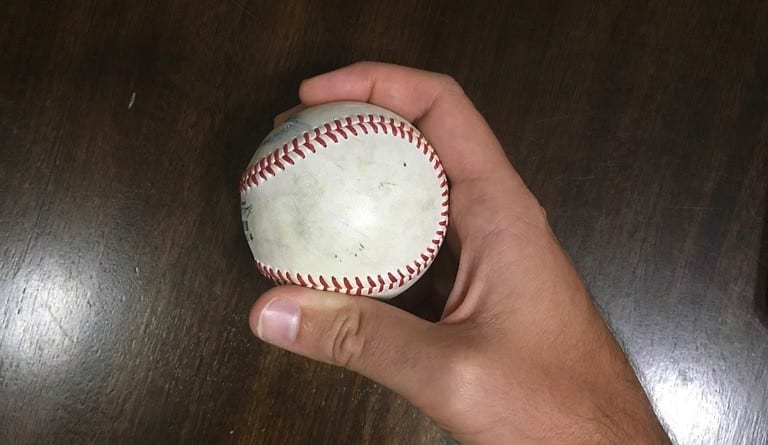
Standard Curveball Grip
Curveball Locations – The Best Place to Throw it
Once a pitcher has learned the pitch, then it’s time to work on throwing it for the proper locations in the strike zone. This will change depending on the count. Learn the best locations for a curveball in the video below.
Okay, So What Are The Other Grips?
There are a handful of variation grips, including the standard one shown above (which is what I threw, and I had a very, very good curveball).
If you want to learn everything about the curveball, check out my definitive guide on throwing it.
Remember that the core of the grip – the middle finger & thumb placement, along with the way the ring and pinky finger fold underneath – these elements are pretty much universal across all the grips you might find.
The main difference is index finger placement:
- Standard (shown above): Index finger rests lightly on the ball without applying pressure
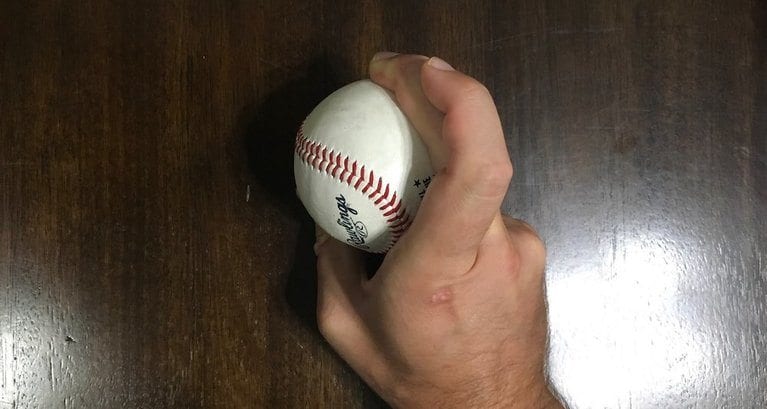
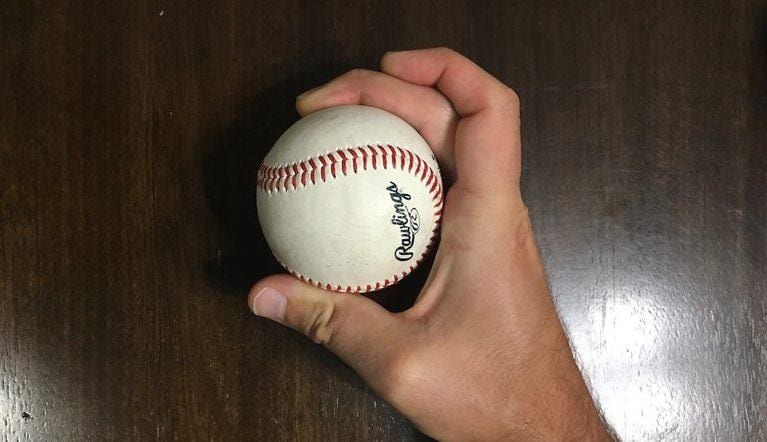
- Crossover: Index finger crosses over and rest atop the middle finger
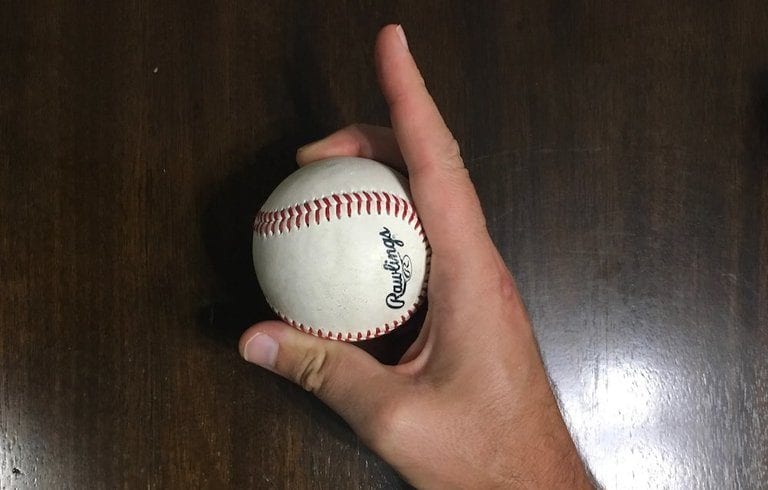
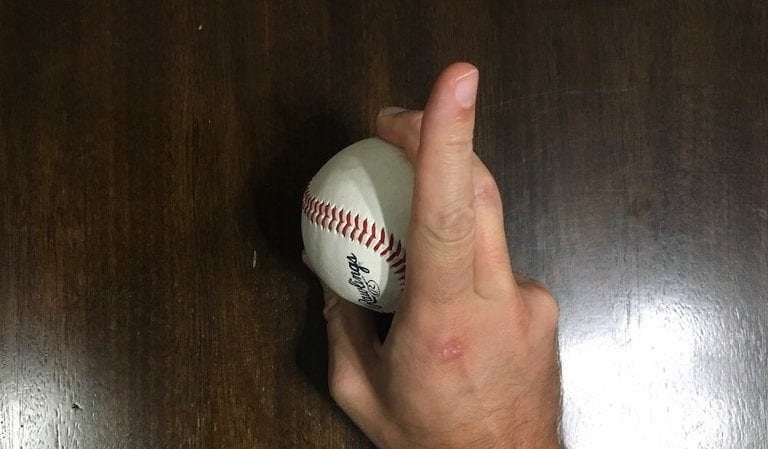
- Pointer: Index finger points straight up, so that it is not resting on top of the ball.
- Fingernail: Fingernail of the index finger digs into the ball slightly, which does not adversely affect spin.
- Knuckle Curve: Commonly thought of as a different pitch, the knuckle-curve is merely a different placement of the index finger, in which the second-digit knuckle of the index finger rests on the ball.
See photos below of each variation.
Crossover Grip
Pointer Grip
Though I don’t recommend pointing your finger up (it can be spotted by hitters) this is one of the more popular curveball grips because Adam Wainright throws it this way.
Fingernail Grip
This is one of the more strange curveball grips, and keep in mind that the finger does not push forward (though some may claim this). It’s really just a placeholder.
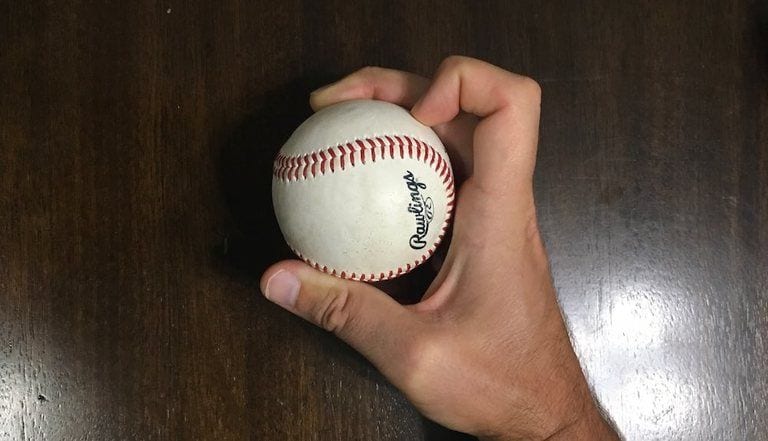
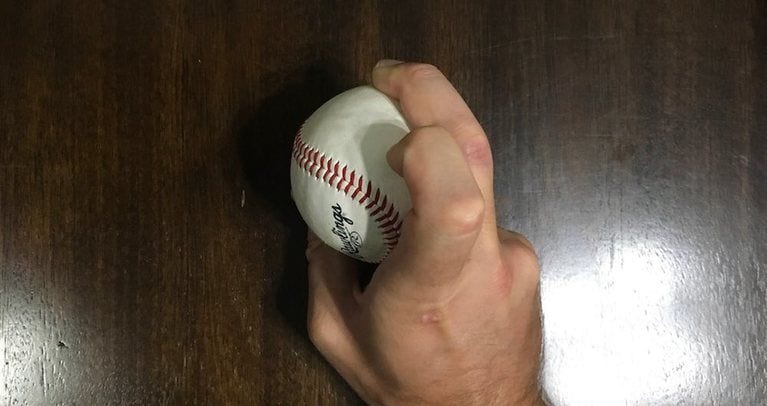
Knuckle Curve
Let’s stop here and talk about the knuckle curve for a bit.
Is it a different pitch? It seems to be described differently, right? “I throw a knuckle curve!” is something pitchers often declare in the same way as they would a slider or changeup. It seems to be in its own category.
But…it’s not. In reality, the knuckle curve merely has a unique finger placement, as shown below in the photos and videos of the knuckle curve grip. It’s the same curveball with the same spin, just a different finger placement.
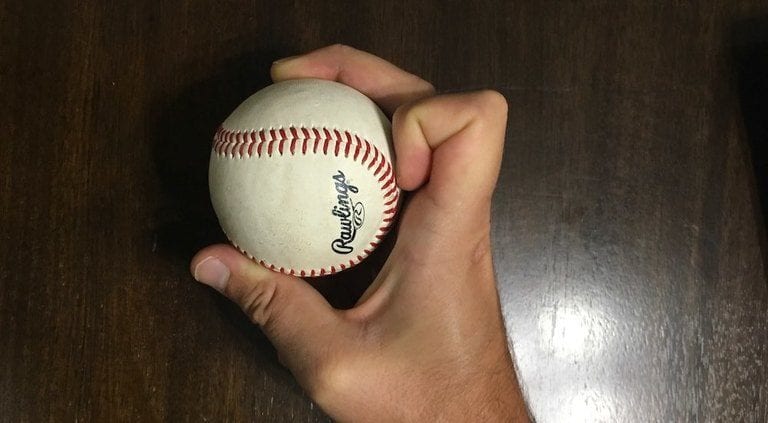
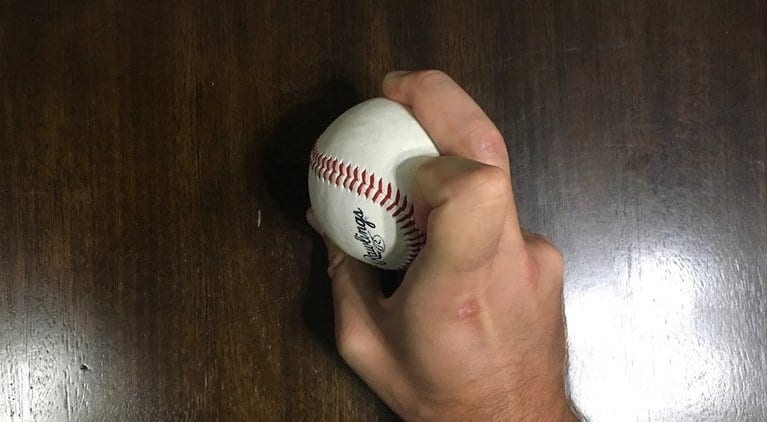
Which Curveball Grip is Right for You?
The grip is the easy part – tinker with different variations and find the one that suits you best – it should both feel comfortable (though they may not at first) and produce good shape and spin. But, remember that the process of learning the curveball and understanding it is much, much more important than the grip.
Learn Good vs Bad Pitching Drills You Can Use Today
Pitch grips and pitching mechanics are both incredibly important for the development of a pitcher. Learn the difference between good and bad pitching drills in the video below.
To learn more about how you should be training as a pitcher, download my pitcher’s checklist. It’s got much more knowledge and can help get you to the next level, well beyond the grip.
More Pitch Grip Resources
- How to Throw a Curveball
- Two Common Curveball Mistakes
- How to Throw a Slider
- How to Throw a Changeup
- How to Throw a Sinker
How To Throw A Curveball Properly – Step by Step
Let’s go through our list:
- Understand how the pitch works? Check.
- Understand how hard to throw it? Check.
- Learned about the grips we should try? Check.
- Learned how to start throwing it? Not check.
Step 1: Start With a Restrictive Drill
We want to try to isolate the hand, which means we should use a drill that allows us to have fewer moving parts. For this, I like to start with throws from the knees, using a target and a barrier to help us learn to apply spin OVER the baseball, instead of through the center of it.
Step 2: Progress To Drills That Allow More Freedom (Just Don’t Throw Hard Yet)
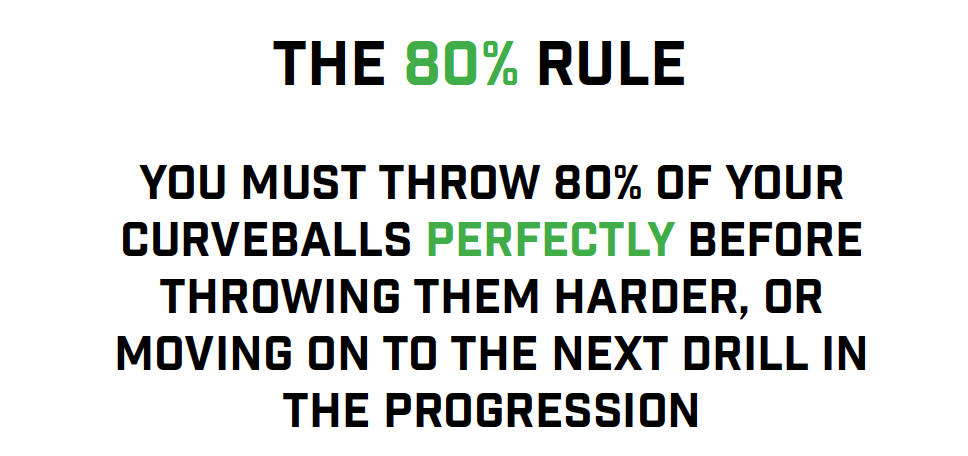
Progress to another drill, then another, adding freedom of movement in each one. Slowly, add speed. Speed is our enemy, because as we add speed, it gets harder to properly apply spin properly. Here, we have to adhere to my 80% Rule…
Why 80%?
We have to hold ourselves to some standard of excellence and attention to detail. If we throw 50% good, and 50% bad curveballs in practice, which one will eventually prevail?
80% is a good benchmark for progression. A pitcher should throw 80%, or 4 out of every 5, with good spin before adding freedom of movement. Then, when he’s at full freedom (using his regular pitching mechanics), he needs to add velocity in accordance with the 80% rule.
This means using drills until the curveball looks good. Then, when it’s consistent enough to throw it from the full mechanics, we may start off at say, 55 miles per hour (just a hypothetical). Then, when 80% is hit, we can throw it harder – say 60mph. Then, 65, 70, etc. until we’re throwing full-speed curveballs with pretty darned good spin.
Step 3: Make Adjustments
In the video below, you’ll find common problems and fixes for hanging, bouncing, throwing loopy curveballs and more.
That’s The Process in Learning to Throw a Curveball.
There is no magic key to success in learning any new pitch, as I explain in my free changeup course. Rather, there is the following:
- Knowledge: Understand the task you’re trying to accomplish – applying the correct spin to a baseball.
- How-To: Applying the task with actionable steps – using the grip and drills to apply the proper spin.
- Honing: Practicing with high attention to detail (80% rule), getting good feedback from a trusted partner.
More Curveball Knowledge
To continue to progress with the pitch, we need feedback every time we throw a curveball. Feedback from a trusted coach or partner, as well as the feedback you give yourself as every pitch leaves your fingertips.
Really, this is the most important step of all – knowing what a good curveball looks like, so that you can keep yourself on track and in compliance with the 80% rule.
And, you have to stick with it. Learning how to throw a curveball well takes a lot of time, patience, trial and error and introspection. Being honest with oneself about how good a curveball is, as well as taking constructive criticism and feedback, are underrated parts of throwing a top-notch curveball. MLB Curveballs continue to get better, so keeping up with the joneses and putting in the work is really important.
Download My Free Pitcher’s Development Checklist
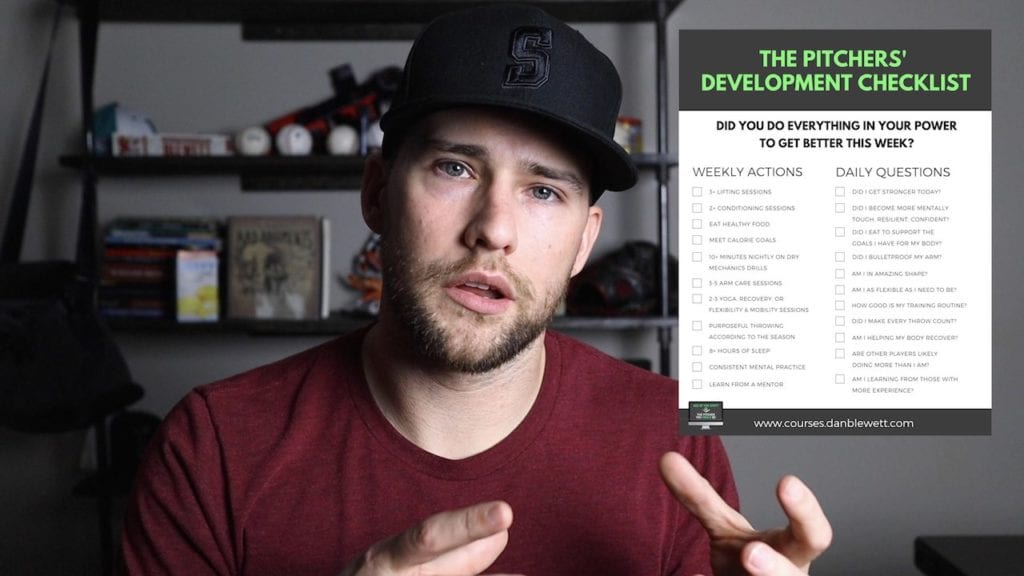
Is the pitcher in your life doing enough? Doing the right things? Training smart?
Get your free copy of my essential pitcher’s checklist. It’s free.
Sign up Today & Grab a Copy of My Pitching Book Below

Thanks for reading and let me know if this article helped you! – Dan Blewett
Curveball FAQ
How do you grip a curveball?
How do you throw a curveball?
Great curveballs have three main factors: speed, spin rate and spin axis.
1. The harder a curveball is thrown, the better, as it makes the break appear more sudden and forces a hitter to decide to swing (or not) sooner.
2. The faster the ball spins (spin rate), the more sharply it will appear to break. There is a strong correlation in the MLB between spin rate on curveballs and swing-and-miss rate.
3. Spin axis – this is the big key, and the big difference between amateur and pro curveballs. The ball needs to spin with a “clean” spin axis, meaning it has only spin in one direction: forward either at a 12-6 orientation or 1-7 (opposite for lefties). The more side spin mixed in, the more softly the curveball will break.
How do I improve my curveball?
The following steps are very important: 1. Throw it often–the more you practice it, the better. 2. Understand the spin you’re trying to produce, and get a catch partner who can give you good feedback. 3. Use a few consistent drills that allow you to more easily feel where you hand is in space, so that you can work on applying better spin with better hand position. 4. Throw it in games. If you don’t throw it enough in games (25-30% is the right amount), then you’re not getting enough repetitions to really see improvement.
Which curveball grips is the best?

No grip is really better than another–it’s all about your unique ability to spin the ball and what’s comfortable in your hand. The possible curveball grips don’t make much difference. Rather, it’s the mechanics, the execution, the hand position and spin that makes the difference. Chances are, the grip you’ll learn in this article (there are five or six of them) will be the same used by many Major League pitchers. So, it’s not the grip, but rather how you throw it and how often you practice it.
Is a curveball or slider better?
Neither is better, and both have pros and cons. Curveballs are harder to throw for strikes and have more of a speed change from the fastball. Sliders are easier to throw for strikes, but have less speed change compared to the fastball. Additionally, when you hang a curveball badly, they typically stay above the strike zone and aren’t crushed as often. Sliders, when thrown poorly, will basically act like batting practice fastballs and stay in the middle of the strike zone. Sliders are a little more dangerous to throw when thrown poorly. It’s best to figure out which one works best for you.
What age should a player start throwing a curveball?
14 or 15 is the right age for most players, but they shouldn’t jump to throwing it 50% of the time. Players should learn the pitch at 14 or 15 years old so they can practice it and start throwing it 10% of the time, then 20%, then 20-30% or so when the pitch is more fully developed. The goal is that a pitcher has an excellent curveball by the time he’s 16, when recruiting is very important for college baseball. But, it’s highly dependent on the player.
Are curveballs safe?
Curveballs are actually proven to be less stressful on the arm than fastballs, according to ASMI research. But, youth pitchers who throw more curveballs also report more arm pain than those who do not. So, the verdict is a little unclear, but it’s best to err on the side of caution and teach pitchers to rely on the fastball, location, and changeup until the freshman year of high school.
